How to adjust a sleeve to your arm circumference
This modification allows you to adjust the width of a sleeve both at the arm circumference and at the wrist.
The technique allows you to add ease if the arm is strong, as well as to remove it if the arm is thin.
It is mainly used for sleeves cut from a warp and weft fabric and having a fitted cut. For knitted sleeves, the greater the extensibility, the more the missing ease will be compensated.
Basic material to perform a transformation
To transform a pattern, it is advisable to have:
-
Adhesive tape
-
A parrot rule
-
A square
-
A graduated ruler
-
A support sheet
-
A pair of paper scissors
-
A fine-tipped pencil/criterion
Definition of the measure to add/remove
At the arm circumference – long sleeves and short sleeves
Set the new sleeve width taking into account the strongest part of the arm. Normally it is located towards the biceps. To define the measure, several options are possible.
Option 1
-
Using a tape measure, measure your bicep and add the desired ease by loosening the tape measure. Slide the tape along the entire length of your bicep to ensure there is enough ease throughout.
-
Measure the sleeve width on the pattern, between the 2 underarm points (from left to right) and compare with the value defined when taking the measurement.
Option 2
-
Measure the sleeve width on the pattern, between the 2 underarm points (from left to right).
-
Place the tape measure around the arm, transferring the value found previously.
-
Check that the entire arm has enough room.
-
Slowly release the tape measure to add ease or tighten the tape measure to remove ease.
Option 3
-
Compare the measurement of your arm circumference at the widest point and without adding ease, with the measurement chart provided with the pattern.
In all cases, the difference in measurement found between the arm and the pattern corresponds to the minimum value to add/subtract from the sleeve pattern.
At the wrist – long sleeves only
The techniques are the same as for the arm circumference. Compare the measurement of the wrist with the bottom of the sleeve.
Please note, it is important to check that the hand fits correctly into the sleeve. If this is not the case, it will be necessary to add more ease.
Route changes
To adjust the arm circumference
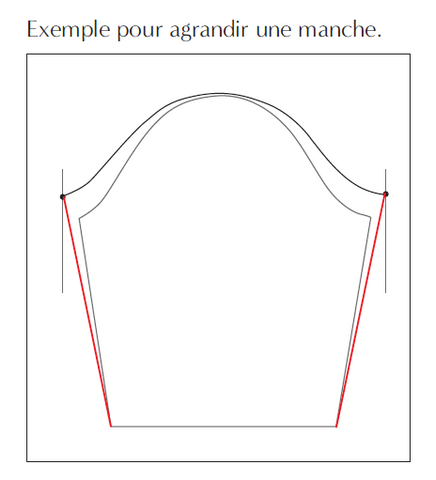
The proposed transformation allows the existing outline of the sleeve head and the back and front armholes on the bodice to be preserved.
-
Transfer the sleeve pattern onto a piece of paper, preferably thick enough. This will make it easier to handle for the next steps.
-
Cut all around the sleeve, flush with the outline.
-
Place the pattern on a large sheet of paper and trace its outline.
-
Locate the highest point on the sleeve head. If there is not already a mark, make one with a pencil.

-
Divide the value to be added/subtracted by 2 and transfer this measurement on either side of the sleeve at the underarm points.
-
Starting from these points, draw a vertical line, parallel to the straight grain, on the background paper.

-
Insert a pin at the sleeve head mark on the pattern.
-
Turn the sleeve to the left, keeping the reference point fixed. Stop when the underarm point meets the vertical line drawn on the paper support. Transfer the outline of the sleeve head along the turned part.

-
Do the same thing on the right, that is to say on the other side of the fixed point.

-
Normally, the underarm stitches are no longer at the same level. If the sleeve has been reduced, the underarm stitch has gone down. If the sleeve has been widened, the underarm stitch has gone up.

-
If necessary, retrace the top of the sleeve head if an angle forms.

-
Trace the sides from the new underarm points to the bottom.

Case of a sleeve with a cutout
Join the 2 parts of the sleeve before making the transformations.

To adjust the wrist
-
On the basic sleeve pattern, mark the hem line at the bottom.
-
Divide the value to be added/subtracted by 2 and transfer this measurement on each side of the sleeve at the bottom. If the measurement needs to be added, extend the bottom line on each side.
-
Trace the sides, from the underarms to the bottom.

If the sleeve consists of a border or a cuff attached to the bottom, the transformation must be applied to the bottom of the sleeve as well as to the border/cuff.

To adjust the arm circumference and wrists
The modifications are the same as before. Start by modifying the sleeve head, then retrace the bottom. 
2 comments
Je dois ajuster une manche en agrandissant particulièrement près du coude.
Je n’ai pas besoin agrandir le poignet ni le tour de bras.
Voulez- vous s.v.p. me faire un croquis.
Merci du conseil, Noëlla
Bonjour,
Comment faire la meme adaptation pour des manches de veste en deux morceaux ? Merci.


