How to adapt a pattern to a square
When talking about build, two elements must be taken into account: the shoulder length but also the ease available at the back. If one or the other of the lines does not correspond to its morphology, the garment will tend to pull towards the back, especially if the model has sleeves.
To solve these problems, several types of modification are possible.
Basic material to perform a transformation
To transform a pattern, it is advisable to have:
-
Adhesive tape
-
A parrot rule
-
A square
-
A graduated ruler
-
A support sheet
-
A pair of paper scissors
-
A fine-tipped pencil/criterion
Broad/narrow shoulders
In this case, it is necessary to modify the length of the shoulders in front and back. This also results in a modification at the level of the shoulders.
-
On the back, draw 2 intersecting axes. The first line (called A) starts from the shoulder, about 5 cm from the armhole and goes down parallel to the straight grain and to the middle of the back. The second line (called B) starts from the armhole, just above the hollow part.
-
Cut on both axes, leaving 2-3 mm uncut at the end of line A, towards the armhole, so as not to completely separate the two parts. This is where the pivot will be made.

Rotate the cut portion of the back outward to add ease to the shoulder and shoulder width or inward to remove ease from the shoulder and shoulder width. 
-
Measure the distance subtracted or added along the armhole towards line B and transpose it to the shoulder level. This way the armhole should maintain its basic length.
-
Trace the shoulder slope in the continuity of the part that has not undergone any transformation.

-
Make the same changes on the front so that the shoulders are the same.

Large/small back build
This time the shoulders and the front do not require any transformation. Only the back width, at the armhole level, needs to be enlarged or reduced.
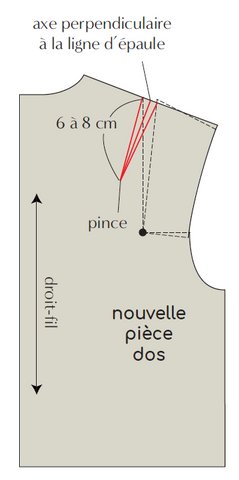
To do this, perform a pivot on the back in the same way as before. Draw line A rather in the center of the shoulder. The value added to the shoulder following the pivot will serve as a clamp. The shoulder length is therefore not affected.
Trace the 2 sides of the clamp according to these instructions: the clamp should be almost perpendicular to the shoulder line and measure between 6 and 8 cm long. 


