Special case of the ZENITH blouse/dress pattern: Adapting a pattern to the chest: the darts on the shelf
This technique consists of making an enlargement of the volume at the chest level on a pattern constructed with several radius-shaped darts. It will be particularly useful for the Zenith top and dress, for example.
But before embarking on modifying the pattern, it is advisable to refer to the articles "The basics of a transformation to the chest" and "Adapting a pattern to the chest: the classic dart".
Basic material to perform a transformation
To transform a pattern, it is advisable to have:
-
Adhesive tape
-
A parrot rule
-
A square
-
A graduated ruler
-
A support sheet
-
A pair of paper scissors
-
A fine-tipped pencil/criterion
Meaning of the clamps in the shelf
This means that the total value of the bust dart is distributed between several axes. For the case of the Zenith top, these are 3 darts placed at the neckline. For the case of the Zenith dress, these are 3 darts placed at the waist.
The basic principles of the technique
Case of a classic clamp
The basic principle for enlarging a pattern at the chest is to draw 3 axes on the front dart. These lines must be quite far apart from each other. The first passes through the middle of the dart and the second must be parallel to the straight grain and the middle of the front.
You then have to cut on these 3 axes, leaving 2 uncut points serving as future pivots.
Spread the 3 parts of the part apart, taking the line parallel to the straight grain as a reference. This axis must absolutely remain vertical until the end of the transformation. It cannot end up tilted and must remain vertical. According to this constraint, the clamp will open naturally during the pivot. Add the necessary enlargement value on the axis parallel to the straight grain.
At the end of the transformation, the line of the pattern through which the axis parallel to the straight grain passes is enlarged due to the spacing. It is therefore necessary to make a correction on the line in order to find its original length.
Case of clamps on the shelf
In the case of radius darts, the principle is exactly the same. You simply have to repeat all the operations as many times as there are darts in order to keep the basic proportions of the pattern.
In the case of the Zenith top and dress, three darts are placed at the neckline or waist. It will therefore be necessary to make 3 spacings using pivot points. The enlargement value must first be divided by the number of darts in order to distribute it fairly.
For example
If we take the example from the article "The basics of a chest transformation", we would have to divide 1.5 cm by 3, which would give us 0.5 cm (= spacing value for each clamp).
Transformation of the Zenith top
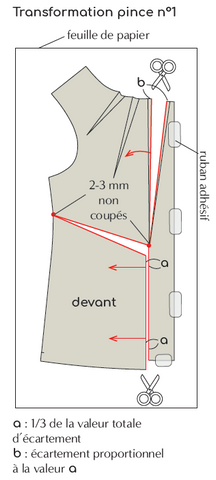
Perform the first spread on the clamp closest to the middle in front.
-
Draw axis A in the middle of the clamp.
-
Trace axis B from the tip of the pliers to the bottom, parallel to the straight grain.
-
Trace the C axis from the tip of the pliers to the side, at an angle.

-
Cut on the axes leaving 2/3 mm uncut in 2 places. This corresponds to the 2 pivot points.
-
Slide the different parts of the pattern so as to move the B axis apart by a third of the total spacing value.
-
Fix the parts on a support sheet.

-
Repeat all the operations for the second clamp, then the third clamp. This time the pivot will be difficult to make if the C axis, at an angle, goes towards the side. It will then be necessary to place it along the armhole.

-
Trace the bottom of the top along the original line starting from the side.
-
We also observe that the bottom of the front has widened proportionally to the measurement added on the axis parallel to the straight grain.
-
Trace the side from the underarm to the bottom, removing the excess value.

Zenith Dress Transformation
Perform the first spread on the clamp closest to the middle in front.
-
Draw axis A in the middle of the clamp.
-
Trace axis B from the tip of the pliers into the neckline, parallel to the straight grain.
-
Trace the C axis from the tip of the pliers to the side, at an angle.

-
Cut on the axes leaving 2/3 mm uncut in 2 places. This corresponds to the 2 pivot points.
-
Slide the different parts of the pattern so as to move the B axis apart by a third of the total spacing value.
-
Fix the parts on a support sheet.

-
Repeat all operations for the second clamp, then the third clamp. For these 2 clamps, the axis parallel to the straight grain should pass through the shoulder line.

-
Trace the shoulder line. We can also see that the shoulder is longer following the transformation. Remove the excess value on the side, at the armhole. The intersection between the armhole and the shoulder must be square.
-
The neckline has also been enlarged. Remove the excess value at shoulder level.

Final adjustment
Check that all the pattern pieces still fit together correctly.
If the front pattern includes a lining or a facing, you will need to transfer the modifications to these pieces.
After all these modifications, it is advisable to carry out a test in a canvas before starting to make your garment.


